CentOS7 환경에서 apache + PHP + Mysql APM 설치 방법에 대해서 설명한다. 소스컴파일 설치 방법이며, 별도의 yum install 방식의 설치는 진행되지 않는다.
1. 설치환경
OS : CentOS 7.1 64bit
CPU: Intel(R) Core(TM) i5-2500 CPU @ 3.30GHz
Ram : 1G
SWAP : 1G
2. 개요
리눅스는 대부분 서버를 구성하기 위해서 많이 사용한다. 윈도우처럼 데스크탑용으로 사용하는 경우는 극히 드물며, centos 의 경우는 더더욱 사용률이 적다. 특히 우리나라는 데스크탑 사용자는 찾아보기가 힘들다는게 많은 아쉬움이 남는다.
오늘은 그래서 서버용으로 설치된 centos7 에 많은 사람들이 사용하는 apache+php+mysql 설치 및 구성에 대해서 살펴볼 것이다.
설치 버전은 다음과 같다.
- apache 2.4.x
- php 7.x
- mysql 5.6.x
3. 설치 및 구성
기본적으로 centos 가 설치된 상태에서 혹시나 rpm 으로 apache+php+mysql(apm) 이 설치가 되어있다면, 지우는걸 추천한다.
yum remove -y httpd*yum remove -y php*yum remove -y mysql*
rpm 으로 설치된 어플리케이션은 소스컴파일보다 여러가지 설정을 컨트롤 하기 쉽지 않으며, 소스컴파일은 설치 과정에서 조금더 최적화 를 진행할수 있는게 장점이다. 또한 디렉토리 관리 데이터 관리 또한 간편하다. (이건 주관적인 입장이다)
그래서 본 포스팅은 소스컴파일 위주로 진행하고, 부득이한 부분은 yum 으로 대처하도록 하겠다.
설치 순서는 필수라이브 러리 -> mysql -> apache -> php 순으로 진행 할 예정이다. 설치는 크게 어렵지 않으며, 순서대로 잘 따라와주면 된다.
1) 필수라이브러리 설치
apache+php+mysql 설치에 앞서 리눅스 os 시스템에 필수 라이브러리를 설치해야된다. yum 을 이용해서 설치하도록 한다.
yum -y install vim php-gdyum -y install net-toolsyum -y install zlib libpng freetype jpeg gd libxml2yum -y install freetype-develyum -y install gmp-develyum -y install libX11-develyum -y install libtermcap-devel ncurses-develyum -y install make cmakeyum -y install gcc g++ cpp gcc-c++yum -y install perlyum -y install gdbm-develyum -y install ncurses-develyum -y install bisonyum -y install zlib curlyum -y install curl-develyum -y install openssl openssl-develyum -y install bzip2-develyum -y install libtermcap-devel libc-client-develyum -y install wget unzipyum -y install libxml2*yum -y install bzip2*yum -y install libjpeg-develyum -y install expat-devel*yum -y install gd-devel*yum install -y perl-Module-Install.noarch
ln -s /usr/lib64/libjpeg.so /usr/libln -s /usr/lib64/libpng.so /usr/libln -s /usr/lib64/libXpm.so.4 /usr/lib64/libXpm.so
2) Mysql 설치
mysql 설치 버전은 5.6.30 버전이다. 각각의 버전별로 설치방법이 조금씩 다르고 구성방법들도 조금씩 달라졌다. 왜 5.6.x 버전을 설치하는지 이유는 간단하다. 이전버전보다 훨씬더 좋은 퍼포먼스를 제공하고 있기 때문이다. 당연한 말이지만..
자 그럼 아래 설치순서를 진행해보자.
mysql 을 다운받는다.
wget http://dev.mysql.com/get/Downloads/MySQL-5.6/mysql-5.6.30.tar.gz
cmake 를 이용해서 configuration 및 make install 를 함께 진행하도록 한다.
cmake -DCMAKE_INSTALL_PREFIX=/usr/local/mysql-5.6.30 -DMYSQL_DATADIR=/usr/local/mysql-5.6.30/data -DDEFAULT_CHARSET=utf8 -DDEFAULT_COLLATION=utf8_general_ci -DWITH_EXTRA_CHARSETS=all -DENABLED_LOCAL_INFILE=1 -DWITH_INNOBASE_STORAGE_ENGINE=1 -DMYSQL_UNIX_ADDR=/tmp/mysql.sock -DSYSCONFDIR=/etc -DMYSQL_TCP_PORT=3306 && make && make install
설치된 mysql 디렉토리를 심볼릭링크로 쉽게 접근할수있도록 변경한다.
ln -s /usr/local/mysql-5.6.30/ /usr/local/mysql
mysql 실행 유저를 생성한다
useradd mysql
mysql 디렉토리 권한을 mysql 실행유저로 변경을 해줘야지 서비스가 정상적으로 올라갈수있다.
chown -R mysql.mysql /usr/local/mysql-5.6.30
ln -s /usr/local/mysql-5.6.30/ /usr/local/mysql
Centos 6.x 버전 이전에 사용하던 시스템 서비스 관리 명령어를 실행하기 위해서 링크를 걸어주는것이다. 이렇게 링크 설정을 하게되면, /etc/init.d/mysqld start 식으로 명령어를 실행할수있으며 service mysqld start 도 동일하다.
ln -s /usr/local/mysql/support-files/mysql.server /etc/init.d/mysqld
mysql data 파일을 생성하는 명령어다. 쉽게 말해서 초기 DB 구성 및 환경설정 작업을 진행한다.
/usr/local/mysql/scripts/mysql_install_db --defaults-file=/etc/my.cnf --user=mysql --basedir=/usr/local/mysql --datadir=/usr/local/mysql/data
/usr/local/mysql/bin/mysql --verbose --help | grep -A 1 'Default options'
mysql 기본환경설정 셋팅(튜닝x)을 진행한다.
vi /etc/my.cnf
-------------추가----------------------------------------[mysqld]datadir=/usr/local/mysql/datasocket=/tmp/mysql.sockuser=mysql
[mysqld_safe]log-error=/usr/local/mysql/data/mysqld.logpid-file=/usr/local/mysql/data/mysqld.pidport=3306-----------------------------------------------------------
실행파일을 심볼릭링크를 걸어줌으로써 간편히 명령어를 사용할수 있다.
ln -s /usr/local/mysql/bin/mysql /usr/sbin/ln -s /usr/local/mysql/bin/mysqldump /usr/sbin/ln -s /usr/local/mysql/bin/mysqladmin /usr/sbin/
64bit 환경에서 php 설치시에는 아래와 같이 lib 디렉토리를 lib64디렉토리로 심볼릭링크 해줘야 설치를 진행할수 있을 것이다. 32bit 는 상관없다.
cd /usr/local/mysql/ln -s lib lib64
아래명령어도 함께 입력한다. mysql 라이브러리를 지정해줘야지, 나중에 php와 연동할때 꼭 필요하다
echo "/usr/local/mysql/lib/" >> /etc/ld.so.confldconfig
mysql 실행한다.
service mysqld start
mysql -uroot -p
패스워드 없이 엔터만 치면 된다.
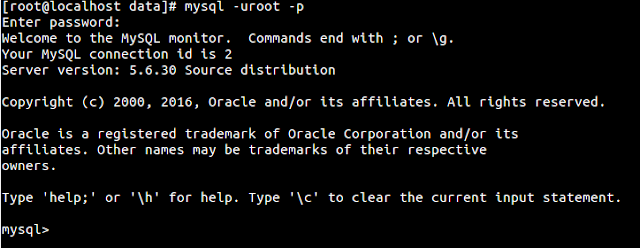
설치 완료 모습이다.
######### 아래는 5.7.x 이상 버전설치 완료시 #########
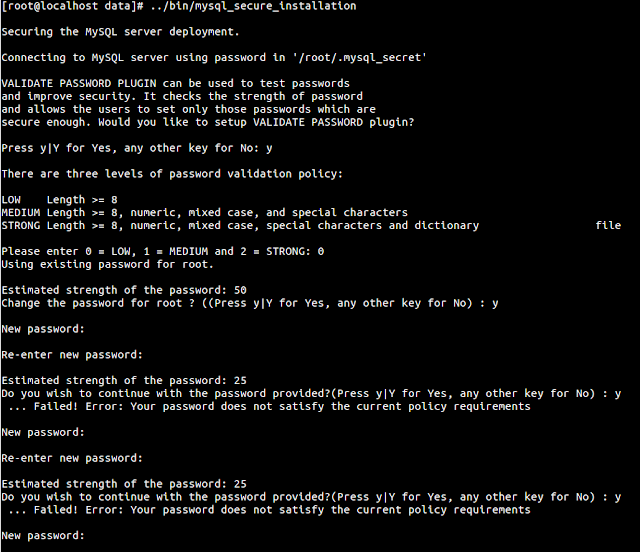
/usr/local/mysql/bin/mysql_secure_installation
---------------설정 화면--------------------------------------------------------------------Securing the MySQL server deployment.Connecting to MySQL server using password in '/root/.mysql_secret'VALIDATE PASSWORD PLUGIN can be used to test passwordsand improve security. It checks the strength of passwordand allows the users to set only those passwords which aresecure enough. Would you like to setup VALIDATE PASSWORD plugin?
Press y|Y for Yes, any other key for No: y
There are three levels of password validation policy:LOW Length >= 8MEDIUM Length >= 8, numeric, mixed case, and special charactersSTRONG Length >= 8, numeric, mixed case, special characters and dictionary file
Please enter 0 = LOW, 1 = MEDIUM and 2 = STRONG: 0
Using existing password for root.
Estimated strength of the password: 50
Change the password for root ? ((Press y|Y for Yes, any other key for No) : y
New password:Re-enter new password:
Estimated strength of the password: 25
Do you wish to continue with the password provided?(Press y|Y for Yes, any other key for No) : y
... Failed! Error: Your password does not satisfy the current policy requirements
New password:
Re-enter new password:
Estimated strength of the password: 25
Do you wish to continue with the password provided?(Press y|Y for Yes, any other key for No) : y
... Failed! Error: Your password does not satisfy the current policy requirements
패스워드 길이가 짧아서 설정이 안되고있는 모습이다. 8글자 이상으로 패스워드를 설정한다.
New password:
Re-enter new password:
Estimated strength of the password: 50
Do you wish to continue with the password provided?(Press y|Y for Yes, any other key for No) : y
By default, a MySQL installation has an anonymous user,
allowing anyone to log into MySQL without having to have
a user account created for them. This is intended only for
testing, and to make the installation go a bit smoother.
You should remove them before moving into a production
environment.
Remove anonymous users? (Press y|Y for Yes, any other key for No) : n
... skipping.
Normally, root should only be allowed to connect from
'localhost'. This ensures that someone cannot guess at
the root password from the network.
Disallow root login remotely? (Press y|Y for Yes, any other key for No) : n
... skipping.
By default, MySQL comes with a database named 'test' that
anyone can access. This is also intended only for testing,
and should be removed before moving into a production
environment.
Remove test database and access to it? (Press y|Y for Yes, any other key for No) : y
- Dropping test database...Success.
- Removing privileges on test database...
Success.
Reloading the privilege tables will ensure that all changes
made so far will take effect immediately.
Reload privilege tables now? (Press y|Y for Yes, any other key for No) : y
Success.
All done!
—————————–설정 완료———————————————————
다시 mysql 를 root 권한으로 실행해보자
mysql -uroot -p
Enter password:
Welcome to the MySQL monitor. Commands end with ; or \g.Your MySQL connection id is 8Server version: 5.7.11Copyright (c) 2000, 2016, Oracle and/or its affiliates. All rights reserved.
Oracle is a registered trademark of Oracle Corporation and/or itsaffiliates. Other names may be trademarks of their respectiveowners.
Type 'help;' or '\h' for help. Type '\c' to clear the current input statement.
mysql 초기 패스워드를 꼭 변경해줘야된다.
mysql> update user set authentication_string=password('1234') where user='root';Query OK, 1 row affected, 1 warning (0.00 sec)Rows matched: 1 Changed: 1 Warnings: 1
mysql> flush privileges;Query OK, 0 rows affected (0.00 sec)
이렇게 mysql 5.7.x 설치 및 실행까지 성공적으로 완료되었다.
#############################################